|
Macro automatically encrypted
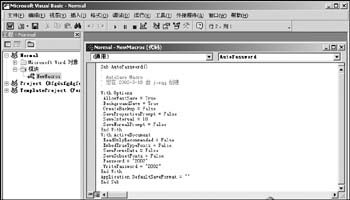
In fact, we can also use macros to automatically encrypt files, select "Tools ★ Macro ★ Macro" command, the pop-up "macro" dialog box, in the "Macro name" enter "AutoPassword", in the "macro location" select "All templates and documentation of activities ", and then click the" Create "button, a" macro "edit window (Figure 3), in the source code window Sub AutoPassword () and End Sub, insert the following code:
With Options Note: The above code ". PassWord =" and "WritePassword =" followed, respectively, the "user password to open" and "Password to Modify", in this case to open and modify the permissions of the password is "2002", the user can to make its own decisions.
 Figure 3 Word's "macro" command editor window
Enter the code above, click on "File" menu "Save Normal", then click "Close and Return to Microsoft Word".
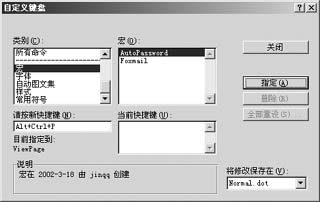
Next in order to more easily use the macro, it is necessary to specify a shortcut. Toolbar in Word, click the right mouse button in the pop-up menu, select "Custom" in "Customize" window, select the "order" tab, then click on the "keyboard" button in the "category", select the "macro" in the "macro" found "AutoPassword", then "please click the new shortcut keys" in the press since the definition of shortcut keys, such as "Alt + Ctrl + P", then click the "designated" button ( Figure 4). After each time a new document, just press Alt + Ctrl + P to add a password for the document.
 Figure 4 shortcut keys can be specified at any time to call the "macro" Finally, it should be noted that: setting a password as far as possible not to use the telephone number, date of birth and identity card, such as easy to guess the number, the length of the password should be at least 6 more than the median. Do not just use a password element, Word Password supports the letters (case sensitive), numbers, symbols (the distinction between the entire half-angle), it is best to use them mixed up. |