|
edit lesson plans that every teacher will encounter work. If Word 2007 is reasonably good use of existing capabilities, can make our editing easier. one, how to overlay text boxes on the form
The usual form of electronic teaching plan is the form of a table for each page. Edit lesson plans in the process of actually completing the appropriate part of the process. However, the course contents more needs to inter-sheet. At this point Word does not automatically shift to the next page. If a large segment of the paste or modify the previous lesson plan, you need to re-adjust to fit the paragraph form. This relatively trouble. This case, if the link with a text box on the much better way. Ribbon first click the "Insert" tab "artwork" function group "shape" button, select "Text Box" and then in the window, drag a text box. Using the same method to get a second text box. Adjusting the size and position them so that they can be up and down the page to fill out the basic contents of the cell borders overlap. And then select the first cell, click the functional areas of emerging "text box tool" under "Format" tab, "text" function group "Create link" button, shown in Figure 1, this time, tilt the mouse pointer will turn into the water cup. Use it in a text box on the second click, you can create links to the two text boxes. Thus, when the contents of the first text box to fill, they will automatically "flow" into the second text box. This is not the equivalent of automatic page yet?
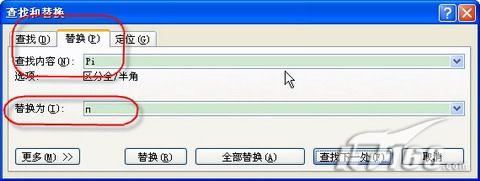
this way can create multiple links between text boxes. Whether the body part lesson plans are divided into several pages, no problem. $ Show_page $ edit lesson plans on many occasions during the often enter some special symbols, formulas, or graphics or something. This will seriously affect the teaching plan of the editing speed. At this point, we can use the Find or Replace automatic correction method to improve the speed. For instance, we need to enter the symbol "дл". find replacement method is this: whatever the need to enter the symbol of the place, all enter the "Pi" (to be confirmed elsewhere in the document will not use this code). When the document editing is complete, with first place in the blank insert "symbol" of the way to enter "дл", press "Ctrl + X" key to cut to the clipboard. Then press "Ctrl + F" shortcut key, open the "Find and Replace" dialog box "" tab "Find what" input box, enter "Pi", the "Replace with" input box and click the mouse and press "Ctrl + V" shortcut key to paste the symbol. Shown in Figure 2. Finally click "Replace All" on it.  Figure 2 Automatic correction method is: first in blanks to enter this symbol "дл", then select the character. Click the "Office button" in the lower right corner of the pop-up menu click "Word Options" button, open the "Word Options" dialog. In the dialog box on the left select "proof", then click on the right list "AutoCorrect Options" button, open the "AutoCorrect" dialog box. Click the "AutoCorrect" tab, verify that "type automatically corrected to" restore option. In the "Replace the contents of" input box, enter "Pi", and then select the right side of the "formatted text", and click below the "Add" button, shown in Figure 3. OK. Just type in the document after "Pi" and hit return, then automatically replaced with "дл" was. This is much simpler than the Search and Replace, but the new document after the method still applies.  Figure 3 $ show_page $ above method is convenient, but if we set the code too much, remember we also remember the. At this point, you will miss the Word 2003, the "AutoText." But Word 2007 although not the 2003 version of the "AutoText" command, but a similar function can achieve the same task. instance, we often need to enter the multiple-choice questions as shown in Figure 4. If every time to reset the trouble of course. So we can do: |