|
View and modify the structure of article-level
Article compares the long position would be more trouble. After the use of style, as the "Heading 1" ~ "heading 9" style with a level, you can easily view the level of the structure and positioning.
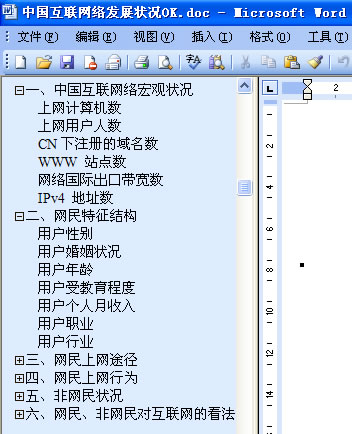
View from the menu to select the command structure of the document can be left in the document shows that the level of document structure, as shown in Figure 11. In which the title, click, you can quickly navigate to the appropriate location. Again from the View menu to select the command file structure, you can cancel the document structure.  If you have a large article in the region need to adjust the location of the content, the former is usually achieved by shearing and then paste. When the regional mobile distance, the same position is not easy to find. View from the menu to select the ¡¾Outline¡¿ order to enter the Outline view. The top will display the document "Outline" toolbar, as shown in Figure 12. In the "Outline" tool bar, choose "Show Level" drop-down list of a level, such as "show level 3", the document will be displayed from level 1 to level 3, in the heading, as shown in figure 13.  
If you want to "professional users" part of the move to "user age" after the mouse pointer can be moved to "professional users" tag before the Cross, the hold down the mouse to drag the contents of "user age" below, you can quickly adjust the location of some of the region. This will not only move the location of the title, which will be mobile with the text.
View from the menu to select the order page can be used to return to the page view to edit the state.
Different parts of the article, sub-section
Different parts of the article will usually start a year, many people are used to blank lines into a number of ways to make the new page from another part, this is a wrong approach, would lead to duplication of layout changes, reducing the work of efficiency. Another approach is to insert a page break page if you want to use different headers and footers, which can not be achieved.
The correct way is to insert sub-sections at different parts of the section is divided into different, it will be able to separate sections for different settings.
Navigate to the title of the second part of the text before the selection from the menu Insert command separator to show "separator" dialog box, as shown in Figure 14. Select the "sub-section at" the type of the "Next" and click OK button, the current cursor position will be to insert a sub-section is not visible at the sub-sections at the cursor position will not only behind the content for the new one, but also the beginning of a new section, to achieve both sub-sections, and paging functions.
The same way in other parts of the article, sub-sections. 
For the cover and directories, sub-sections can also be a way to use them in a different section. In the article, enter the first article, the headline and directories, as shown in Figure 15, and then in the "Contents" before the word "one, the macro situation of the Internet in China," the text before the inserted sub-sections Fu. 
If you want to cancel sub-section, just delete the sub-section can address. Sub-sections can not be printed at the characters, by default does not appear in the document. Click on the toolbar "Show / Hide Edit tag" button  To see the hidden tag editor. In Figure 16 and Figure 17 as shown in, respectively, show a different section at the end of the sub-sections.  
In the paragraph marks and between sub-sections at Click by ¡¾Delete¡¿ key to delete the section breaks, section breaks and before and after the two merged into one. |